So it has been FOREVER since I last blogged. And by forever, naturally I mean 5 months. Pretty sure that is how Webster's defines it... Anyhow, as you might have guessed, I have done some awesome things these past 5 months that the world should know about. Or like the 3 people who will read this. It would probably make sense to write about the project chronologically, but where is the fun in that? So I will start with one of my favs: SPIKE'S BIRTHDAY PRESENT!!! (From June '14).
 So for those of you who didn't see Spike's 2013 birthday present, I had a comic book cover drawn up making him the hero [Insert some corny statement here about him being my hero]. As you may have guessed, Spike is a bit of a comic book nerd.
This year for his birthday, I again wanted to incorporate his love for comics, without replaying last year's idea. After some much need Pinteresting time, I found it! People were making and selling pieces of furniture collaged with different comic book images. Rather than buying something that wasn't necessarily tailored to Spike, I decided to go ahead and make it myself. After all, I am no stranger to Mod Podge, in fact I am obsessed with it. And if you don't know what Mod Podge is, shut your computer down, go to Michael's, and BUY SOME! Become a collage master! It's vital!
Here was the final product for those of you who rather not read all the steps:
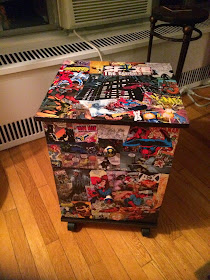 Awesome, right? It looks even cooler in person.
Here is how I did it:
Step 1: Find the piece of furniture
I looked around for a while before I settled on this 2 drawer wood mini filing cabinet. I wanted something that has a flat surface, that way it would be easier to decoupage and collage all the comics together. I finally settled on this.
Step 2: Casually bring up the topic of Comics to Spike in order to find out the name of his favorite Artist
The point of making this myself was to make it custom for Spike. So I wanted to make sure all his favorite comics were on there, as well as his favorite Artists of those comics. Spike is a Marvel man. This I know. Spiderman is his guy. This I know. His favorite artist though? He definitely told me. Probably should've known it. But had no idea. Luckily it was pretty easy to get the 411 out of him without causing any suspicion. What? I'm just taking interest in his interests! That's what girlfriends are supposed to do, right? Well, turns out its John Romita, Jr..
Step 3: Track down and purchase the Comics
In the end, I purchased maybe 3 comic books (those softcover books that have like 10 actual comic stories in them). And a book that was all about Romita, Jr. that way I would have a selection of his comics.
Step 4: Buy the decoupage materials
- Medium Sized Mod Podge Gloss (You can go with Matte too for a less shiny finish)
- 4-5 big/small foam brushes (I like these best as they are REALLY cheap and you don't feel guilty about chucking them once you're done)
- Mod Podge Roller & Scraper (this gets the air bubbles from under the picture so that way there aren't bumps everywhere... MUST HAVE! trust me, I learned this the hard way).
Step 5: Cut up all the comics
Go through the comic books, and find strips or images of all shapes and sizes that you want to incorporate. The more the better! You can always throw them out if you have extras, but it gets tedious if you have to constantly sift through the comic books mid-project to find the right comic strip. I used a photo box to store all the pre-cut comics in.
Step 6: Label all the pieces of the assembled furniture

This step, while a tad boring, is necessary. Use the instruction manual, and figure out which piece is what. Then take some scotch tape, put a strip on the back of each piece, and label what it is which a sharpie/pen. *MAKE SURE TO PUT AN ARROW TO INDICATE WHAT IS THE TOP SIDE!* With this kind of cheaper furniture, the sides that are going to be in the back or facing down, are often times unfinished. Also, the holes are in proper places for assemble. The problem here is you can accidentally decoupage all the comics facing the wrong way and that looks like shit. (Again, learned this the hard way!) But don't fret, decoupage is so awesome, that if you do fuck up, you can use an exacto knife to take off the entire layer of comics and replace it right-side-up.
Step 7: IT'S DECOUPAGE TIME! (to the hammer time tune)

 Quick decoupage tutorial if you haven't done it before: Use the decoupage as the glue, using the foam brush apply to the back of the comic strip. Place wherever you want it. Use your Mod Podge roller and scraper to release all excess glue and bumps. Keep collaging until you can no longer see the furniture. Cut off any comic strips that may go over the edge of the furniture piece. Once all desired pieces have been collaged, use the Mod Podge as the top coat. Apply an even layer with the foam brush, always going in the same direction. Once dry, apply a second coat.
Step 8: Assemble the Furniture
Take off that tape, and pull out the instruction manual. I'm no dude, I ALWAYS use the manual. Too many nails... I need my shit organized. To add a special touch: Buy custom drawer knobs. I got these Marvels Avengers ones in blue, then put the extras in the drawer in case he ever wanted to switch them out. Also, I wrote a little note on the inside of the bottom drawer, to add that level of corniness every birthday present needs.
Step 9: Bask in the utter satisfaction of him LOVING your present
That is all.


So for those of you who didn't see Spike's 2013 birthday present, I had a comic book cover drawn up making him the hero [Insert some corny statement here about him being my hero]. As you may have guessed, Spike is a bit of a comic book nerd.This year for his birthday, I again wanted to incorporate his love for comics, without replaying last year's idea. After some much need Pinteresting time, I found it! People were making and selling pieces of furniture collaged with different comic book images. Rather than buying something that wasn't necessarily tailored to Spike, I decided to go ahead and make it myself. After all, I am no stranger to Mod Podge, in fact I am obsessed with it. And if you don't know what Mod Podge is, shut your computer down, go to Michael's, and BUY SOME! Become a collage master! It's vital!
Here was the final product for those of you who rather not read all the steps:

Here is how I did it:
Step 1: Find the piece of furniture
I looked around for a while before I settled on this 2 drawer wood mini filing cabinet. I wanted something that has a flat surface, that way it would be easier to decoupage and collage all the comics together. I finally settled on this.
Step 2: Casually bring up the topic of Comics to Spike in order to find out the name of his favorite Artist
The point of making this myself was to make it custom for Spike. So I wanted to make sure all his favorite comics were on there, as well as his favorite Artists of those comics. Spike is a Marvel man. This I know. Spiderman is his guy. This I know. His favorite artist though? He definitely told me. Probably should've known it. But had no idea. Luckily it was pretty easy to get the 411 out of him without causing any suspicion. What? I'm just taking interest in his interests! That's what girlfriends are supposed to do, right? Well, turns out its John Romita, Jr..
Step 3: Track down and purchase the Comics
In the end, I purchased maybe 3 comic books (those softcover books that have like 10 actual comic stories in them). And a book that was all about Romita, Jr. that way I would have a selection of his comics.
Step 4: Buy the decoupage materials
- Medium Sized Mod Podge Gloss (You can go with Matte too for a less shiny finish)
- 4-5 big/small foam brushes (I like these best as they are REALLY cheap and you don't feel guilty about chucking them once you're done)
- Mod Podge Roller & Scraper (this gets the air bubbles from under the picture so that way there aren't bumps everywhere... MUST HAVE! trust me, I learned this the hard way).
Step 5: Cut up all the comics
Go through the comic books, and find strips or images of all shapes and sizes that you want to incorporate. The more the better! You can always throw them out if you have extras, but it gets tedious if you have to constantly sift through the comic books mid-project to find the right comic strip. I used a photo box to store all the pre-cut comics in.
Step 6: Label all the pieces of the assembled furniture

This step, while a tad boring, is necessary. Use the instruction manual, and figure out which piece is what. Then take some scotch tape, put a strip on the back of each piece, and label what it is which a sharpie/pen. *MAKE SURE TO PUT AN ARROW TO INDICATE WHAT IS THE TOP SIDE!* With this kind of cheaper furniture, the sides that are going to be in the back or facing down, are often times unfinished. Also, the holes are in proper places for assemble. The problem here is you can accidentally decoupage all the comics facing the wrong way and that looks like shit. (Again, learned this the hard way!) But don't fret, decoupage is so awesome, that if you do fuck up, you can use an exacto knife to take off the entire layer of comics and replace it right-side-up.
Step 7: IT'S DECOUPAGE TIME! (to the hammer time tune)
Quick decoupage tutorial if you haven't done it before: Use the decoupage as the glue, using the foam brush apply to the back of the comic strip. Place wherever you want it. Use your Mod Podge roller and scraper to release all excess glue and bumps. Keep collaging until you can no longer see the furniture. Cut off any comic strips that may go over the edge of the furniture piece. Once all desired pieces have been collaged, use the Mod Podge as the top coat. Apply an even layer with the foam brush, always going in the same direction. Once dry, apply a second coat.Step 8: Assemble the Furniture
Take off that tape, and pull out the instruction manual. I'm no dude, I ALWAYS use the manual. Too many nails... I need my shit organized. To add a special touch: Buy custom drawer knobs. I got these Marvels Avengers ones in blue, then put the extras in the drawer in case he ever wanted to switch them out. Also, I wrote a little note on the inside of the bottom drawer, to add that level of corniness every birthday present needs.
Step 9: Bask in the utter satisfaction of him LOVING your present
That is all.

